Loading the Cartridge
For safety´s sake, wash both hands thoroughly, dry with a disposable towel and put latex gloves on both hands before opening the sterile blisters or touching the customer´s ear.
1. Make sure the instrument is cleansed before and after each use.
2. Remove the twin blister from the package and seperate the twin blister by tearing along the perforation between the cartridges. For your convenience, Sterile Prep Pads are packaged with the studs for cleaning the customer´s ears.
3. Peel off the paper backing from one blister, exposing the piercing cartridge.
DO NOT REMOVE THE CARTRIDGE FROM THE BLISTER.
4. Holding the sides of the plastic blister firmly with the opening on the bottom, slide the clasp end of the cartridge down and forward into the channel in the instrument until it is seated fully forward (figures 3A & 3B).
5. Rotate the back of the cartridge down into the channel until it is firmly seated as shown in Figure 3C.
6. Lift off the plastic blister (Fig. 3D). Do not discard the plastic blister, as you will need it later.
7. You are ready to pierce (Fig. 3E).
DO NOT TOUCH THE CARTRIDGE AT ANYTIME.
Always use the blister as a holder when installing, removing or transporting the cartridge. In this way, sterility of the the piercing studs and clasps is maintained, and accidental worldwide contact with the customer´s body fluids is avoided.

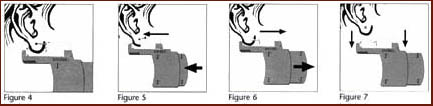
Piercing the Ear
Be sure the ears have been cleansed with the Sterile Prep Pad provided. You may also use a cotton ball saturated with Studex Ear Care Solution or alcohol.
1. Place the ear between the end of the stud and the clasp, carefully aligning the point of the stud with the marked ear as shown in Figure 4. While maintaining proper alignment, slowly squeeze the handle. This will slide the stud forward for more accurate positioning.
2. Keeping the proper alignment, squeeze the handle firmly to pierce the ear. The clasp will be automatically installed on the stud with the proper spacing (Figure 5).
3. Release pressure on the handle (Fig.6) and carefully pull the handle straight away from the ear (towards the bottom of the handle) - See figure 7. This will release the stud from the clear plastic carrier and the clasp from the cartridge.
4. Remove the used cartridge from the handle (see removal instructions) and discard the cartridge and the blister. Repeat this procedure for additional ear piercings.
After piercing is complete, wipe the pierced area of the ear (front and back) with a cotton ball saturated with STUDEX Ear Care Solution. Apply MediSept Ear Care Gel to the front and back of each piercing. Give the customer after-piercing care instructions to take home with them.
NOTE: When the piercing is complete, ask the customer if they are able to stand up, or if they need a few minutes. If the customer stands up and feels dizzy, help them sit down, and have them wait 3 to 5 minutes before leaving.
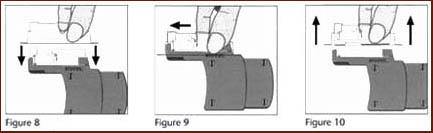
Removing the Cartridge
1. After piercing, place the plastic blister (the one that the cartridge came in) down on top of the used cartridge as shown in Fig. 8.
2. Firmly holding the sides of the blister as shown in Figure 9, slide the blister and cartridge slightly forward to release the cartridge from the channel.
3. Lift the entire cartridge assembly straight up and out of the channel (Fig.10).
4. Dispose of the used cartridge and blister in the appropriate manner.
DO NOT TOUCH THE CARTRIDGE AT ANY TIME.
Always use the blister as a holder when installing, removing or transporting the cartridge. In this way, sterility of the piercing studs and clasps is maintained, and accidental worldwide contact with the customer´s body fluids is avoided.
|