UNIVERSAL PIERCING SYSTEM

>OPERATING INSTRUCTIONS

 
<< 1 2 3 4 >>
 

PREPARING FOR PIERCING-
A. Preparing the Customer
1. Have the customer select the style of piercing stud they would like from the
Studex Ear Piercing Selection display board.
2. Have the customer complete and sign the Release Form.
3. Have the customer sit in the designated piercing area.

B. Preparing Yourself for the Ear Piercing
First familiarize yourself with the piercing instrument and the packaged studs (see Figures 1 and 2). It is very important that you present yourself as a confident, expert ear piercer to the customer. The more comfortable you are, the more at ease your customer will be. This will help the customer relax and relieve any anxiety they might be experiencing.
1. Thoroughly wash both hands with soap and running water and dry thoroughly with a disposable towel. Put disposable latex glowes on both hands BEFORE proceeding with the ear piercing.
2. Check the customer´s earlobes for cysts. When you pinch the earlobe and feel a small, hard lump that can be moved, it is probably a cyst. If you can see and feel a lump that doesn´t move, it is most likely scar tissue (cysts are not visible and can be moved). You may pierce through scar tissue, but never through a cyst, as it may rupture spreading debris into the surrounding tissue, which can cause an infection.

C. Marking the Ears
1. Have the customer take off any earrings they are wearing
2. Cleanse the customer´s ears with MediSept? Ear Care Solution and a cotton ball or use the MediSept Sterile Prep. If neither is available alcohol may be used.
3. Ask the customer where they would like the piercing to be and mark the ears accordingly with the non-toxic Marking Pen (see Figure 3).
4. Have the customer check and approve the marks BEFORE proceeding with the piercing. The customer should not touch their ears after cleansing.


EAR PIERCING INSTRUCTIONS-
Replacing an Existing Adapter Without using the Studex Adapter Clip
1. When you first receive your instrument, the Regular adapter is already in the plunger of the instrument. If you are piercing with either a Mini or Large stud, you must remove the Regular adapter and install the proper adapter for the studs you are using. The Mini and Large adapters are stored in the handle of the instrument.
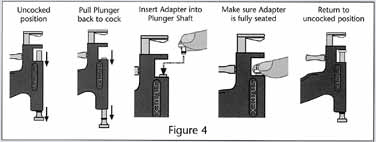
2. Hold the trigger in and pull the plunger all the way back past the cocked position, until the plunger cannot be pulled any farther. The adapter will dislodge itself from the plunger enough to be easily removed.
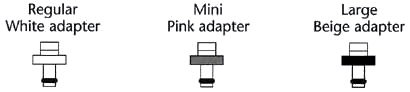
3.Select the proper adapter for the studs you will use to do the piercing. The adapters are color coded for ease of identification:


4. With the plunger in the cocked position, press the desired adapter into the front of the plunger as far as it will go.
5. Once the adapter is properly seated in the plunger. Pull the trigger to return the plunger to the uncocked position (Figure 4).


<< 1 2 3 4 >>


  home | system 75 | universal piercing system | medisept personal piercer | after piercing care products
after piercing care advice | hypoallergenic jewelry | ear works | body piercing | downloads | contact us


copyright © 2003 studex. all rights reserved.